Thursday, May 27, 2010

Flat Bread Pizza

My husband brought some authentic Iraqi flatbread back from Nashville, which we have kept in the freezer to preserve freshness. So I assembled the pizza with the bread still frozen. It worked out great, because the bread did not get over-done before the pizza was  ready. This flatbread is not the same as pita bread, it has no pocket. The summer sausage was an accident. I asked my husband to bring me halal hot dogs, and this is what he got me, so I figured out a way to use it.


1 8-oz. package Italian cheese blend
Alfredo sauce, any brand
Spaghetti sauce of your choice
Halal Summer Sausage


Iraqi style flatbread, Alfredo Sauce, Italian cheese, halal summer sausage


Iraqi style flatbread, Spaghetti sauce, Italian cheese blend, Halal summer sausage


Only one slice was left of this one, when I got the camera to the finished pizza. This was the one with spaghettie sauce, and it was finished first, so it got eaten first.


This is the one with the alfredo sauce. It was finished last, so I got to it with the camera before it was eaten.

Wednesday, May 26, 2010

Chicken Tenders

This is a recipe with a little story behind it. When I was pregnant with the twins, I craved a crispy chicken sandwich, and none of the halal restaurants in our town served anything like that. So I began experimenting and playing around until I prefected this recipe. So I could eat them in a sandwich. When I was learning how to make it, I kept imagining how I am one day going to serve this to my twins when they are big enough to eat it. That time arrived faster than I expected.
1 Thawed halal chicken breast

Slice it across the grain of the muscle.


Slice it fairly thin.


Place 1/4 cup of either unbleached all-purpose flour, or garbanzo and fava bean flour, in a gallon size zip-lock bag. I like to use garbanzo and fava flour when I can find it. Add spices to taste. I use about a half teaspoon each, of ground mustard powder, garlic powder, paprika, salt and pepper.

Put the chicken in the bag also, and give it a good shake, to coat it with the flour and spices.

To make the final coating, Panko Bread crumbs, stick, I make an egg wash. 2 egg whites, and 1 Tablespoon of water whisked together.

Dip the flour-coated chicken tenders in the egg wash.

Then coat them in Kikkoman Panko Bread crumbs. These are by far the best brand I have used. I press the crumbs into the chicken to help them stick, and to flatten the chicken tenders a bit.

They are now ready to fry, or place in the fridge to fry later in the day.

Always Pompeian, first cold pressed, extra virgin olive oil all the time.

Chicken breast should be cooked quickly on very high heat, and then removed, to avoid getting tough chicken. About a minute or a minute and a half on each side.

Place the cooked chicken on paper towel to drain excess oil. My kids can not wait to dig into this plate. They stand around and say, "chik-in, chik-in, chik-in," when they see me preparing these. They are very familiar with the procedure.

This is their favorite side dish. The secret to good corn on the cob, is to use FRESH corn. Never use frozen corn. Bring the water to a boil before plunging the corn into its boiling bath. If it starts to boil too fast, just reduce the heat a bit, and tilt the lid, but make sure it keeps on boiling. Corn should be in the water about 20 minutes from start to finish, even though it stops boiling for a few minutes right after you add the corn to the water. When finished, drain away the water. Don't let the corn sit in the water long after it is finished or all the flavor will leech into the water. My boys love to chew corn off a cob.

Tuesday, May 25, 2010

Wrap of Sushi Flavors

DRESSING:

2 Tablespoons Miracle Whip (it is way lower in fat and sodium than mayo)
1/2 teaspoon sesame oil
1 teaspoon soy sauce


Spread the dressing on a flour tortilla, rice paper would be also nice, if you can find it.


Add a layer of grated cucumber.


Some Pickled Ginger or Sushi Ginger, and some precooked shrimp.


Add a handful of organic salad greens. With both hands press the greens down and roll the tortilla into a wrap. Eat! It is a nice, light meal for hot summer days.

Monday, October 5, 2009

How to Tame the Hubbard Beast (Squash)

This one is relatively small, compared to the average size for a hubbard squash. I placed it in the sink, washed it off and decided to tackle its demise in the sink, because it seemed more stable in the sink than on the counter.

I used my sturdiest knife and was able to pierce the surface with relative ease, but I could not continue sawing with only the strength of my arms. So I got my household hammer and hammered near the handle on the dull side of the knife blade. I left most of the blade plunged inside the squash, and hammered it all the way around the squash.

It was a very tough job, but I got it open, however roughly. I used this dipper to scoop the seeds out.


You can throw the guts away, or you can clean the seeds, wash them and then dry them with a paper towel.
Toss them in olive oil, sprinkle them with some sea salt and toast them at 350 degrees farenheit until golden brown and crunchy. They are great for snacking.


This is what the tamed beast (cleaned squash) looks like.


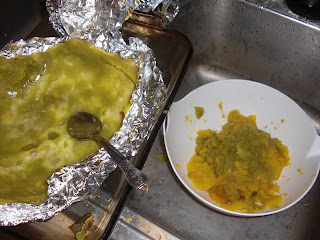
Wrap them each in two or three layers of foil, you may like to place them on baking dishes or pans to catch potential drips. Bake them at 350 degrees farenheit until soft. I baked mine about 2 hours.


Then I scooped the pulp out and mashed it some more. I measured it into freezer bags, 2 cups per bag and froze it until I want to use it. It is excellent as a soup base, to thicken and flavor the broth. I also use it in muffins, waffles, cheeseless macaroni and cheese, pumpkin custard. It gets very creamy if you puree it in the food processor. I have even been known to eat pureed winter squash with I Can't Believe It's Not Butter spray and maple syrup or brown sugar.

Apple Cider Waffles

Dry ingredients:
1 cup unbleached all-purpose flour
2/3 cup whole wheat flour
1/4 cup brown rice flour
2 Tablespoons cornstarch
4 teaspoons baking powder
1 teaspoon cinnamon, or to your taste

Measure all dry ingredients, except cornstarch, into the bowl.
Fluff them by whisking them all together.


1 cup Blue Diamond Original Almond milk
1 cup apple cider or apple juice
1 pre-measured serving cup of applesauce, or 1/2 cup of apple sauce from a larger container

Dissolve the cornstarch in the almond milk before adding it to the dry ingredients. Add the cider and the apple sauce.
Just blend it all with a wooden spoon.
Be careful not to over-mix the batter.
Cook them according to the cooking instructions from your waffle maker's manufacterer.


Serve it with I Can't Believe It's Not Butter spray and pure maple syrup, or caramel sauce would even be nice, since it is an apple flavored waffle. A cup of black coffee is a fabulous companion to wash the sweetness down.
Note: applesauce replaces oil, and cornstarch replaces eggs in any recipe.

Wednesday, September 23, 2009

Vegan Pumpkin Muffins


1 1/2 cups unbleached all-purpose flour
1 1/2 cups whole wheat flour
2 Tablespoon baking powder
1 tsp. baking soda
1 teaspoon fresh ground nutmeg
1 teaspoon cinnamon
1/2 teaspoon ground cloves
1 1/2 cups Sugar in the Raw
1 cup crushed pecans (optional)
1 Tablespoon cornstarch
1 cup Blue Diamond original almond milk
1 teaspoon vinegar
1 can pureed pumpkin (15 oz.)

I crush my nuts in this cute pestle and mortar I got at an Arabic store and I grate my nutmeg with this little rasp I got at the Dollar Tree. I never pay top dollar for kitchen items, because when they break I just toss it out and buy another. Most of the things I get from the Dollar Tree last as long as things I buy elsewhere, for more bucks. What's the point in spending more? I ask you.

1. Use a wire whisk to fluff the dry ingredients until well blended, in a large bowl.
2. Add pecans now, if they are desired.
3. Pour the almond milk into a separate bowl and add the cornstarch and vinegar
4. Add the pumpkin and whisk it gently into the milk mixture.


5. Now gently fold the wet ingredients into the dry ingredients with your wooden spoon.
6. Let the batter rest on the counter, while you preheat the oven at 350 degrees Fahrenheit.


7. Spray the inside of your muffin tin with alcohol free cooking spray and divide the batter evenly between the muffin cups.

8. Bake them until a tooth pick comes out clean, about 20 or 25 minutes.


9. Can you tell what I am thinking? Mmmmmmm, that healthy, light, fat-free, yet tall, sweet, yummy, and fluffy muffin with some plain black coffee is perfect for a light autumn lunch.
Added bonus, muffins are always a winner with my husband and kids, and they do not know they are eating healthy. Mama truely knows best. Heehee.